Getting Started
[RemoteViz]
Overview
Open Inventor® RemoteViz enables software developers to easily integrate advanced 3D visualization into their web- based applications. It brings rich remote 3D interaction and visualization capabilities to web-based applications, while maintaining a high level of interactivity and visual performance on any display device including tablet, phone, laptop, or workstation.
Principles
Current mobile devices allow for the development of interactive 3D applications that download data and render locally. However, most of these devices have limited bandwidth, computing power and storage capacity, which make visualization and interaction with 3D data very limited. 3D data can be extremely complex in terms of geometry (large number of triangles) and size (large volumetric data). Using local rendering means data transfer time is limited by the network bandwidth, data set size is limited by the local memory and rendering performance and image quality are both limited by the local graphics hardware. Transferring data to a remote device may also not be possible for data security reasons. To face such constraints, Open Inventor® RemoteViz offers a Client/Service model: the data access, computing, and 3D rendering are performed on the server side by the Open Inventor® RemoteViz service, while the client application only needs to provide the user interface and display each frame (image) sent from the service. No 3D hardware is required on the client side.
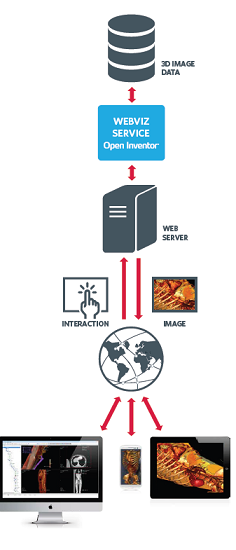
1. The Service is in charge of executing the Open Inventor code:
- interprets events from client
- renders scene using Open Inventor
- sends image to client
2. The Web server serves the web page containing the displaying area.
3. The client:
- captures user requests and system events
- sends them to the remote RemoteViz service
- receives images and displays them
Windows Service
Licensing
To use an Open Inventor extension with RemoteViz, please refer to the documentation of the method RemoteViz::Rendering::ServiceSettings::setUsedExtensions.
Run a demo
-
Go to "OIVHOME/examples/bin/OIVARCH/RemoteViz" and run "RemoteVizHelloConeRenderingService.exe". (By default, the HelloCone sample uses the port 8080)
WARNING: Note that if the selected port is used, an error will occur. Refer to reference manual to solve this problem. -
Go to the folder "OIVHOME/examples/source/RemoteViz/HelloCone/Clients/HTML5" and open the "index.html" file inside a web browser. The HelloCone application will do the rendering and you will obtain a web page with the rendering of the scene graph.

-
Now you can use the mouse to interact with the scene.
Mouse interactions:
Mouse left button: spin the scene.
Mouse move + Ctrl key: pan the scene.
Mouse Wheel: Dolly/zoom camera.
-
Touch interactions:
1 finger: spin the scene.
2 fingers rotate on the screen plan: zoom and pan (rotation and zoom center are located between the fingers).
Double tap: view the entire scene.
- You can open again the index.html file then several clients are connected to the service; they will share the same rendering and send their own requests.
Build a demo
Build using VC++ Project on Windows
b. Select the Release or Debug configuration according the value of the environment variables and build RemoteVizHelloCone project.
Regenerate project using CMake (Windows and Linux)
a. Set following parameters:
Where is the source code = "OIVHOME/examples/source/RemoteViz/HelloCone/HelloConeRenderingService"
Where to build the binaries = <outputCmakeFolder>
b. Select Configure: Generator
c. Select Generate: this command will generate the .sln and .vcxproj files on Windows and Makefiles on Linux in the folder <outputCmakeFolder>.
Demo in Docker
Containers running on a single machine share the same operating system kernel; they start instantly and use less RAM. Images are constructed from layered filesystems and share common files, making disk usage and image downloads much more efficient.
Docker can build images automatically by reading the instructions from a Dockerfile. A Dockerfile is a text document that contains all the commands a user could call on the command line to assemble an image. Using docker build, users can create an automated build that executes several command-line instructions in succession.
We provide the Dockerfile necessary to build a container image that can run a demo.
A linux distribution is required and NVIDIA graphics card too.
To run a RemoteViz demo, an OpenGL context is required. To get an OpenGL context in a Docker container, you have to install the version of Nvidia drivers matching exactly (major and minor version) the version of Nvidia drivers installed on the host.
Run the RemoteVizHelloCone demo in a Docker container
Go to the Docker folder in OIVHOME/examples/source/RemoteViz/Docker.
Open the ReadMe.txt file and follow the instructions.
To go further
- BasicHTMLGUI: This example shows you how to interact with the RemoteViz service to change the color of the Cone.
- BasicJQueryGUI: This example shows you how to use Jquery library in the client-side.
- ClientWorkbench: This example enables you to load your Open Inventor 3D model and adjust the RemoteViz settings in real-time. This example is provided with a client written in JavaScript using Jquery library and a client written in TypeScript using Angular framework.
- MobileApp: This example is made for mobile devices. The scene is displayed in full screen.
- SharedViewer: This example enables you to load your Open Inventor 3D model and share the session between many clients.
- ConnectionManagement: This example shows you how to filter the client connections (accept or refuse) by using the GET parameters included in the RemoteViz Service URI.
- InventorApplication: This example shows you how to use RemoteViz with an Open Inventor viewer component. The scene graph is shared between the viewer component and the RemoteViz application.
- SecureConnection: This example shows you how to enable the secure connection between the server and the clients.
- IndependentService: This example shows you how to use your own render engine in a RemoteViz application by using the independent service mode.
- HelloConeH264: This example shows you how to enable H264 encoding in a RemoteViz application. This demo requires an NVIDIA GPU Kepler or higher and CUDA Toolkit 8.0.
- RemoteVizClientNode: This example shows you how to integrate remote 3D interaction and visualization into an Open Inventor viewer.
- RemoteVizScreenDrawer: This example shows you how to integrate remote 3D interaction and visualization with a screen drawer into an Open Inventor viewer.